第二章:开发环境设置
根据预期的用例,有多种安装Odoo的方法。本教程将使用 source install ( 从源代码运行Odoo ),这是最适合Odoo开发人员的方式。
在本文中,我们假设您正在Odoo提供的笔记本电脑上安装开发环境,并安装了最新的Linux Mint。如果不是这样,根据安装指南的任何部分,切换到 Windows or Mac OS 选项卡,这取决于你使用的是哪种操作系统。步骤基本上是一样的。
设置Git
安装和配置Git
安装过程的第一步是安装 Git版本控制系统 ,因为Odoo源代码是在 GitHub 上管理的。
$ sudo apt install git
小技巧
用下面的命令打印Git的版本,检查Git是否已经安装:
$ git --version
安装完成后,请注册您的姓名和邮箱:
$ git config --global user.name "Your full name (trigram)"
$ git config --global user.email "xyz@odoo.com"
配置GitHub
您需要一个GitHub帐户来获取源代码并为Odoo的开发做出贡献。如果你还没有,创建一个。对于用户名,我们建议使用“xyz”(或quadrigam)后接 “-odoo”: “xyz-odoo”。
使用GitHub进行身份验证最简单的方法是使用SSH连接。使用SSH身份验证允许您连接到GitHub,而不必在每次键入命令时提供用户名和密码。
注解
下面的步骤是基于 官方GitHub文档 。
生成一个新的SSH密钥,将其添加到SSH -agent,并将SSH密钥复制到剪贴板。
$ ssh-keygen -t ed25519 -C "xyz@odoo.com"
$ ssh-add ~/.ssh/id_ed25519
$ sudo apt install xclip
$ xclip -sel clip < ~/.ssh/id_ed25519.pub
进入 GitHub.com ,然后点击页面右上角的个人资料图片,然后点击 Settings。

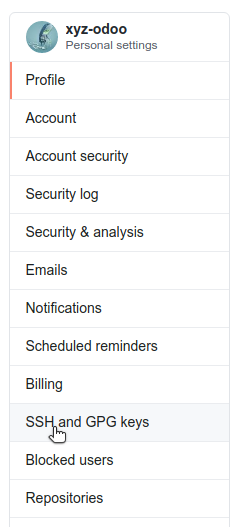
在用户设置侧边栏,点击 SSH和GPG密钥 。

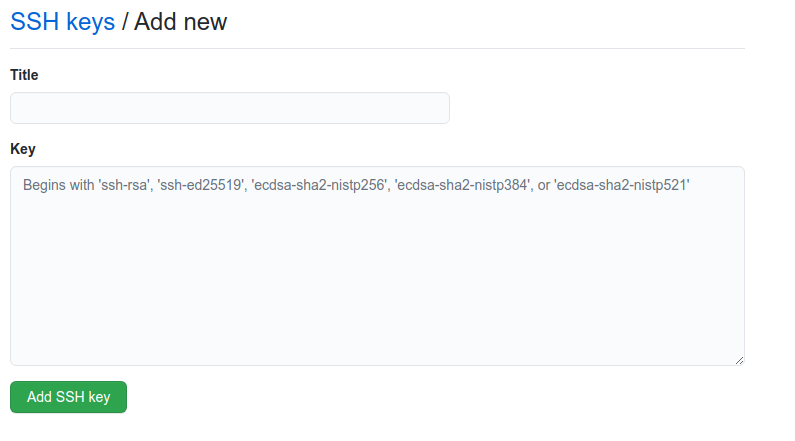
点击 New SSH key 或点击 Add SSH key 。

在 Title 字段中,为新键添加一个描述性标签。
将你的键粘贴到 Key 字段中。

点击 Add SSH key。
获取源代码
是时候获取Odoo的源代码了。首先,让我们在 $HOME/src/ 中为Git存储库创建一个home。
$ mkdir -p $HOME/src
$ cd $HOME/src
然后,用SSH克隆两个存储库,如 Installing Odoo guide 中解释的那样。
小技巧
克隆存储库将需要一段时间,在等待的时候享受一杯咖啡。
配置Git存储库
要向Odoo存储库贡献内容,您首先需要 fork it ,然后创建一个包含您在fork上的更改的分支,最后向存储库提交一个 Pull Request 。
小技巧
如果你有幸在Odoo工作,你会发现forks已经存在了。它们托管在https://github.com/odoo-dev/odoo和https://github.com/odoo-dev/enterprise上。
创建两个分叉后,可以将它们的远程地址添加到本地存储库中。在下面的命令中,如果需要,将 doo-dev/odoo 和 doo-dev/enterprise 替换为您的fork的名称。
$ cd  $HOME/src/odoo
$ git remote add odoo-dev git@github.com:odoo-dev/odoo.git  # Add odoo-dev as a new remote.
$ git remote rename origin odoo  # Change the name of origin (the odoo repository) to odoo.
$ git remote set-url --push odoo no_push  # Remove the possibility to push directly to odoo (you can only push to odoo-dev).

$ cd  $HOME/src/enterprise
$ git remote add enterprise-dev git@github.com:odoo-dev/enterprise.git
$ git remote rename origin enterprise
$ git remote set-url --push enterprise no_push
安装的依赖关系
如 第1章:体系结构概述 所示,Odoo的服务器运行在Python上,使用PostgreSQL作为RDBMS。在开发机器的上下文中,最简单的方法是在本地安装所有内容。为此,再次遵循 Installing Odoo guide 。
小技巧
一些有用的SQL命令:
$ createdb $DB_NAME  # Create a database.
$ dropdb $DB_NAME  # Drop a database.

$ psql $DB_NAME  # Connect to a database.
    \l  #List all the available databases.
    \dt  #List all the tables of the $DB_NAME database.
    \d $TABLE_NAME  #Show the structure of the table $TABLE_NAME.
    \q  #Quit the psql environment (ctrl + d).
运行服务器
Launch with odoo-bin
一旦所有的依赖都设置好了,Odoo可以通过运行 odoo-bin 启动,这是服务器的命令行界面。
$ cd $HOME/src/odoo/
$ ./odoo-bin --addons-path="addons/,../enterprise/" -d rd-demo
有多个 command-line arguments 可以用来运行服务器。在本次培训中,您只需要其中一些。
- -d <database>
将要使用的数据库。
- --addons-path <directories>
用逗号分隔的存储模块的目录列表。扫描这些目录以查找模块。
- --limit-time-cpu <limit>
防止worker为每个请求使用超过<限制> 的CPU时间。
- --limit-time-real <limit>
防止worker处理请求的时间超过 <limit> 时间。
小技巧
参数
--limit-time-cpu和--limit-time-real可用于在调试源代码时防止worker被杀死。- You may face an error similar to
AttributeError: module '<MODULE_NAME>' has no attribute
'<$ATTRIBUTE'>
. In this case, you may need to re-install the module with $ pip install --upgrade --force-reinstall <MODULE_NAME>.If this error occurs with more than one module, you may need to re-install all the requirements with $ pip install --upgrade --force-reinstall -r requirements.txt.You can also clear the python cache to solve the issue:$ cd $HOME/.local/lib/python3.8/site-packages/ $ find -name '*.pyc' -type f -delete
Other commonly used arguments are:
Log in to Odoo
Open http://localhost:8069/ on your browser. We recommend using Chrome, Firefox, or any other browser with development tools.
To log in as the administrator user, use the following credentials:
email:
adminpassword:
admin
Enable the developer mode
The developer or debug mode is useful for training as it gives access to additional (advanced) tools. In the next chapters, we will always assume that you have enabled the developer mode.
Enable the developer mode now. Choose the method that you prefer; they are all equivalent.
注解
The main page of the Settings screen is only accessible if at least one application is installed. You will be led into installing your own application in the next chapter.
Extra tools
Useful Git commands
Here are some useful Git commands for your day-to-day work.
- Switch branches:When you switch branches, both repositories (odoo and enterprise) must be synchronized, i.e. both need to be in the same branch.
$ cd $HOME/src/odoo
$ git switch master

$ cd $HOME/src/enterprise
$ git switch master
Fetch and rebase:
$ cd $HOME/src/odoo
$ git fetch --all --prune
$ git rebase --autostash odoo/master

$ cd $HOME/src/enterprise
$ git fetch --all --prune
$ git rebase --autostash enterprise/master
Code Editor
If you are working at Odoo, many of your colleagues are using VSCode, VSCodium (the open source equivalent), PyCharm, or Sublime Text. However, you are free to choose your preferred editor.
It is important to configure your linters correctly. Using a linter helps you by showing syntax and semantic warnings or errors. Odoo source code tries to respect Python’s and JavaScript’s standards, but some of them can be ignored.
For Python, we use PEP8 with these options ignored:
E501: line too longE301: expected 1 blank line, found 0E302: expected 2 blank lines, found 1
For JavaScript, we use ESLint and you can find a configuration file example here.
Administrator tools for PostgreSQL
You can manage your PostgreSQL databases using the command line as demonstrated earlier or using a GUI application such as pgAdmin or DBeaver.
To connect the GUI application to your database we recommend you connect using the Unix socket.
Host name/address:
/var/run/postgresqlPort:
5432Username:
$USER
Python Debugging
When facing a bug or trying to understand how the code works, simply printing things out can go a long way, but a proper debugger can save a lot of time.
You can use a classic Python library debugger (pdb, pudb or ipdb), or you can use your editor’s debugger.
In the following example we use ipdb, but the process is similar with other libraries.
Install the library:
pip install ipdbPlace a trigger (breakpoint):
import ipdb; ipdb.set_trace()
Example
def copy(self, default=None):
    import ipdb; ipdb.set_trace()
    self.ensure_one()
    chosen_name = default.get('name') if default else ''
    new_name = chosen_name or _('%s (copy)') % self.name
    default = dict(default or {}, name=new_name)
    return super(Partner, self).copy(default)
Here is a list of commands:
- h(elp) [command]
Print the list of available commands if not argument is supplied. With a command as an argument, print the help about that command.
- pp expression
The value of the
expressionis pretty-printed using thepprintmodule.
- w(here)
Print a stack trace with the most recent frame at the bottom.
- d(own)
Move the current frame one level down in the stack trace (to a newer frame).
- u(p)
Move the current frame one level up in the stack trace (to an older frame).
- n(ext)
Continue the execution until the next line in the current function is reached or it returns.
- c(ontinue)
Continue the execution and only stop when a breakpoint is encountered.
- s(tep)
Execute the current line. Stop at the first possible occasion (either in a function that is called or on the next line in the current function).
- q(uit)
Quit the debugger. The program being executed is aborted.
Now that your server is running, it’s time to start writing your own application!