Product variants
Product variants are used to give single products a variety of different characteristics, such as size and color. Products using variants can be managed at the product template level (for all attributes and variants of that product), and/or at the variant level (for individual variants).
As an example, a company selling t-shirts may have the following product:
T-shirt
Color: Blue, Red, White, Black
Size: S, M, L, XL, XXL
In this example, the T-Shirt is the product template, and T-Shirt, S, Blue is a product variant. Color and size are the attributes. S and Blue are values.
The above example has a total of 20 different product variants (5 sizes x 4 colors). Each one of these has its own inventory, sales, etc.
Configuration
Activating product variants
To use product variants, go to , and enable the Variants feature. Finally, click Save to apply the setting.

Creating attributes
Attributes need to be created before product variants can be set up. Attributes can be accessed via .
Note
The order of attributes on the Attributes page dictates how they appear on the Product Configurator, Point of Sale dashboard, and eCommerce pages.
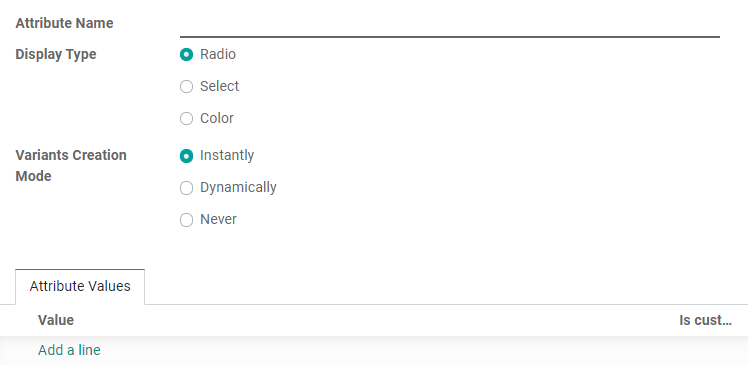
To create a new attribute, click Create. First, choose an attribute name, such as “Color” or “Size.”

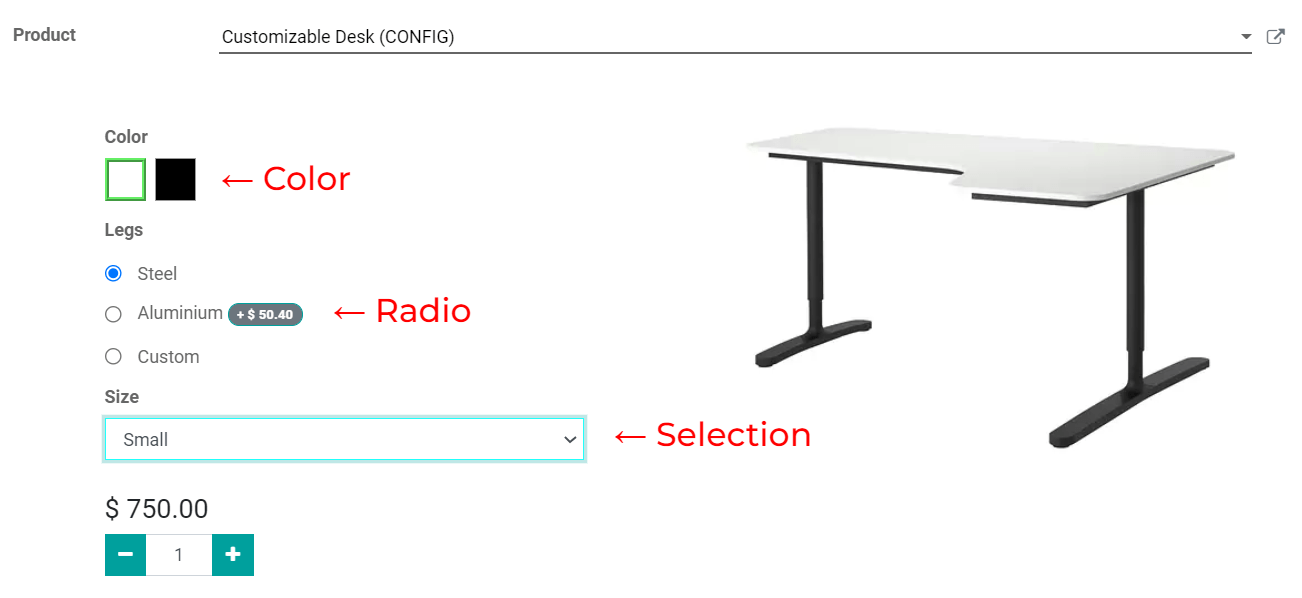
Then, select a Display Type, which determines how this product will be shown on the eCommerce page, Point of Sale dashboard, and Product Configurator.
Radio: options appear in a bullet style list.
Select: options appear in a dropdown menu.
Color: options appear as small colored squares, which reflect any HTML color codes set.

The Variants Creation Mode informs Odoo when to automatically create a new variant once an attribute is added to a product.
Instantly: creates all possible variants as soon as attributes and values are added to a product template.
Dynamically: creates variants only when corresponding attributes and values are added to a sales order.
Never: never automatically creates variants.
Note
Once added to a product, an attribute’s Variants Creation Mode cannot be edited.
Values should be added to an attribute before saving, but more values can be added at any time, if needed. To add a value, click Add a line. From there, you can:
Type in the value’s name.
Check a box to indicate whether or not the value is custom (i.e. the customer provides unique specifications).
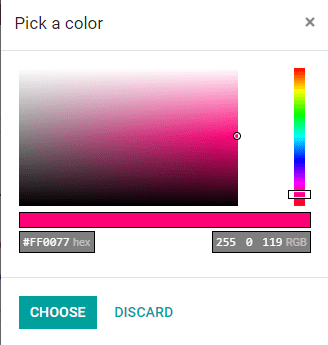
Specifically for colors, add an HTML color code to make it even easier for salespeople and customers to know what they’re selecting.
A color code can be selected either by dragging the slider around or by entering a specific HTML color code (e.g. #FF0077).

Finally, click Save to finish creating the attribute.
Tip
Attributes can also be created directly from the product template by adding a new line and typing the name into the Variants tab.
After an attribute is added to a product, a new tab appears on the attribute’s page called Related Products. This tab lists every product in the database that is currently using the attribute.
Creating product variants
After creating an attribute, use the attribute to create a product variant by going to . Then, select an existing product and click Edit, or create a new product by clicking Create.
The Variants smart button at the top of the product template indicates the number of currently configured variants on the product.
To add a new variant, click on the Variants tab, then click on Add a line to add any attributes and values. When all the attributes and values have been added, click Save.
Tip
Similar product variant creation processes are accessible through the Purchase, Inventory, and eCommerce applications.
Managing product exclusions
The following examples are all based on a product template that has two attributes:
T-Shirt
Color: Blue, Red, White
Size: S, M, L, XL, XXL
With the above product template, there are 15 different t-shirt variants in three different colors and five different sizes. If the white t-shirts are not available in the XXL size, then that variant can be deactivated.
To deactivate a particular product variant, go to and select the relevant product. Next, click on the Configure Variants button, open the relevant product variant attribute value form (in this example, the White Color attribute), and then click on Edit.
In the Exclude for section, click Add a line and select any product(s) and/or specific attribute values that are currently unavailable. Finally, click Save to apply the setting, and Odoo will automatically show the product variant as unavailable on the eCommerce page.

Setting a price per variant
Extra costs can be added to a product’s standard price for specific product variants.
To do this, open , and click on the relevant product. Next, click on Configure Variants to access the list of product variant values.
Then, click on a variant value, and Edit. In the Value Price Extra field, type in the additional cost for this particular value. This amount is added to the standard price. Finally, click Save to apply the extra price to the value.

Impact of variants
Barcode: barcodes are associated with each variant instead of the product template. Each individual variant can have its own unique barcode/SKU.
Price: every product variant has its own public price, which is the sum of the product template price and any extra charges for particular attributes. For example, a red shirt’s cost is $23 because the shirt’s template price is $20, plus an additional $3 for the red color variant. Pricelist rules can be configured to apply to the product template or to the variant.
Inventory: inventory is counted for each individual product variant. On the product template form, the inventory reflects the sum of all variants, but the actual inventory is computed by individual variants.
Picture: each product variant can have its own specific picture.
Note
Changes to the product template automatically apply to every variant of that product.